Friday, July 20, 2012

The melding of a South American FJ40 tub, and the Original Cowl

Since I began this project for Ken there has been the looming task of joining the "tub" he bought out of South America somewhere, to the original Cowl.

First, I have to say... This tub was incredible! The quality and craftsmanship is great! The sheet metal is nice and heavy, the form and fit was nice. This is not to say it fell together, but it was extremely close!

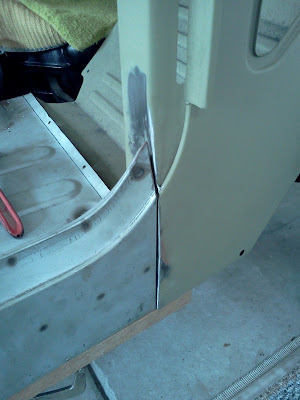
The only modifications I had to make were toward the front of the tub where the rocker panel meets the cowl. The width was spot on, but the rockers were slightly twisted. Meaning the top of the rockers where it curves up to a point, were tipped to the inside a bit.
This is pretty standard for mating up pieces like this. Chances are that the original factory parts didnt fit as well as we made this one fit!

So with a little bit of cutting on the inside of the tub along the floor to free up the rocker, I was able to twist the top of the rocker out to be flush with the cowl.

We also had to trim a little bit of excess to get a nice clean body seam. Again..... nothing out of the norm when mating body panels! However......... This was news to Ken who has never done anything like this. He naturally went into this Saturday morning thinking we would be done in an hour! ;-)

So the following pictures are several hours of fitting, grinding, fitting, cutting, and more fitting to get a nice clean mate up! Hope you like!


A nice tight body seam... Still not quite right though...... The "point" at the top will be welded entirely...

Here is the floor pan overlap. It sits on a structural body cross member as well.


Inside the rocker. I removed the flange that would normally bolt into that hole partially because it was holding the body seam open on the outside and also because.... its really not needed since the cowl gets welded on in so many places! Its not like you can un-bolt the cowl anyway! :)


Starting to look good! The radius following the doors looks good, and the seam is nice and tight!


Here she is all tacked in place! Its starting to look like a vehicle again!
Beautiful engine by the way!!!!


Another "tacked in" picture.


Needless to say Ken was quite happy to see some progress and of course a piece this large makes it seem like a lot of progress has made. As we all know this is the kind of stuff that gets a forgotten project rolling again!


Pin It Now!

Wednesday, July 11, 2012

Railings and such of the past.

So, I was digging through pictures of stuff I have made and realized I have made quite a few gates and hand rails. Here are a few!


One of several gates I have made for Tom.

This was made as an entry gate to his back yard, and deck area.


More of Kens handrail details.


So here are several rails I had to dig for. Turns out most of the pieces I built when I was doing this for a career are what they have on their website as advertisement!

All of these were hand built. Rolled, designed and welded by me!


This curving staircase was a first for me. It came out very nice however.


A few hand built Awnings.


Pin It Now!

Wednesday, July 4, 2012

Mikes Ford Bronco Frame REPLACEMENT section.

So a co-worker and friend of mine picked up a Ford Bronco several years ago. He first had a 66 Mustang that he realized wasn't what he really wanted to build and so he refocused and settled on an early Bronco.
He had a fairly rusty project to start with and first began by redesigning the floor patches, had them laser cut, and powder coated with zinc to seal them for the coming stent of time that is inevitable for most of us with projects such as this..............YEARS............   :-)

One other area that needed serious attention was the rear half of the frame rails. Basically everything after the  front set of leaf spring mounts was a prime candidate for repair. Rather than patch in repair sections, he opted to redesign the entire rear rail, however wanting to keep it original looking was key.

After some playing around and discussion, it was decided to make side plates that matched the original contours, and make two shallow "C" channel caps for the top and bottom. We cut slices where the channel need to follow the contour of the side plates and the pictures below show the assembly and welding process.


                                                           Bead after bead, nice and clean!

Here you can see the slices that were made in the channel in order to follow the contour of the side plates.

More weld shots.


Here I attached the Shock strut. This was of course set up based on the original placement.


Pin It Now!

Monday, July 2, 2012

Kens Contemporary Style Handrail

Here are a few pictures I snapped of Kens handrail completely installed.
Construction of this rail consists of 1/4" plate "posts" that I designed and had laser cut. Mounting plates were also laser cut and were part of the posts. Originally the plan was to use stainless steel cable and the appropriate hardware however as with most project the cost quickly became an issue. It is because of this that we decided to utilize 3/8" steel rod and have it powder coated to match the posts. During assembly the rod is passed through holes in the posts and the rods were drilled and tapped on each end to hold them in place.


The finish install was completed by Ken, and all wood work was also completed by Ken

Here are some of the laser cut "raw" materials.
I like to "slot and tab" all of these pieces so they fit well and are uniform.


Pin It Now!