Tuesday, February 19, 2013

Fiat floor pans are in!

Well, as you can see its been a month or so since I began this little car. That's just how things go when ya do this stuff on the side. With a family and normal family stuff to do.... these projects tend to drag out longer than maybe they typically would. Love it the way it is though! Wouldn't trade em' for a damn thing!

Drivers Side Floor to be replaced.

Old style seat belt rings. (These were quite sketchy)    :)

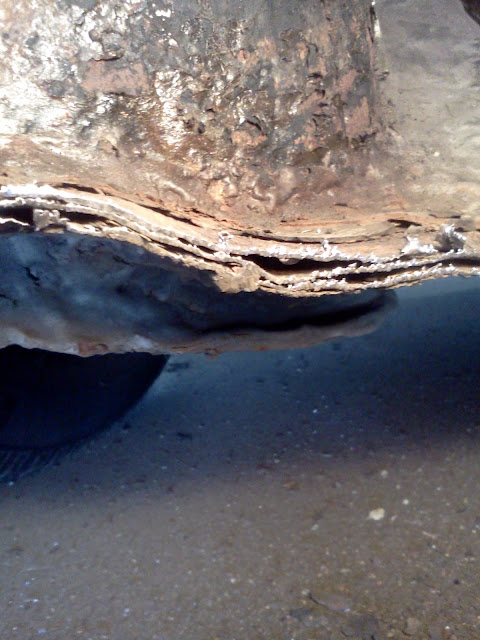
Here is the rear floor pan on the drivers side. What you cant see here are the multiple patches made to the area in the center of the picture.

SO MANY LAYERS!!!! Terrible workmanship! It took me a bit to clear all this old stuff away carefully.
There are fuel lines, battery cables, wires, etc. running under this side. 

All cleaned up and ready to start fitting the new pan.

Here are a few more pictures of the multiple layers that made up the floor where your feet would typically rest.

4 possibly 5 layers if I remember correctly!


Again with the layers of patches!

 I am now closing in on the finish work. I plan to seam seal all the edges on the underside of the car, as well as inside, then Ill be spraying the new pan with under coating / sound deadening spray.

All in all, the job hasnt been too bad. Work went pretty quickly once I was able to get to it! :)

Entire Album Link: https://plus.google.com/photos/107331329764947692089/albums/5833307280228466897

Pin It Now!

Monday, January 14, 2013

Ginny's 1960 Fiat.

Well here I am back at another project containing a multitude of rust. Needless to say if it weren't for rust I wouldn't have nearly as much business! :)

This project came to me as a referral from a local artist, friend, and Pinstriper extraordinaire "Igor" Acord. In a previous post I worked on the floor replacement in his 1935 Ford Humpback. The floors turned out pretty nice and apparently he agreed since he sent Ginny and Scott my way with this seriously cool little Fiat.

Just dropped off and begging to be cut!


Isnt that cute! The covered car is my wifes 1946 Plymouth.
Sure dwarfs this little Fiat!


The doors folding back so far is an incredible help here.


After I pulled it in the garage, I realized that maybe I need to get smaller project cars! This thing fits beautifully!


Drivers side, rear floor.


Rubber spacers WERE being used to lift the seat to account for years of leaning back in the seat and bending the seat back. (The seats will be fixed as well)   :-)


Emergency escape for mice? Hmmmm


Drivers side floor. (someone along the way has knocked holes in the floor to access some bolts)


Passenger side rear floor.


Passenger floor. This is most definitely the second time the floor pans have been replaced! (You'll see)


Again with the bolt access holes. :-/


Some of the first evidence I see of a previous repair.


More previous repair.


Again with the old replacement work. This is along the center of the car, which happens to be the heating channel for the entire car. (Similar to a VW floor pan)


More weld along side the seat rails.


This is actually covered by a sheet metal cap which contains a lever. The lever actuates the rod (sticking out of the tube on the left) which opens a valve allowing heat from the engine into the cabin of the car through the channel in the middle.


More of the previous repair. This was pretty rough work here. Lots of beating and banging was had in this area. Not to mention layer after layer of sheet metal.


More of the same...


Again with the poor welds.


Let the layers begin! Here you can see the 1st one peeled back. This was the floor that the seat was mounted on.


Here you can see 4 layers!!!! Lots of repairs have happened and not the right way!
Needless to say... Me and my ways have removed all the excess sheet metal in preparation for the new pans.


Again with all the layers! Ugh!!!!


This is the inner fender well. This area is going to be interesting! There is a lot of patch work under there. Its holding out ok, but itll be a challenge to find good clean steel to weld to.


Lastly...... A sneak peek! I am just fitting the panel at this point. I still have a good hour or two in prepping the surfaces for weld, making sure the panel is a quality fit. Then I plan to drill holes around the perimeter of the floor pan in order to "plug weld" the pan to the flange (ledge) that I managed to save all the way around.
By doing it this way (Plug welding) it will be very close in appearance to factory style "spot welds" as well as, not leave an weld for me to grind down.


Thats it for now.... I wont be getting back to it for a few days as my daily life takes precedence!


Pin It Now!

Friday, December 14, 2012


Been a while since I have been able to get away from the daily stuff in order to get some work done for others.
These rear doors were pretty rough. Much of the bottom was just gone in general.  I had nothing to work with to even make a template.
So first I built the outer door skins. Tacked them in place and once I was happy with it I began building the 10 other pieces that ended up being the inner structure.
I wanted to make this as stock as possible for the sake of the door seals mating correctly when closed. I could have easily just used one piece and wrapped around the corner however I could have possibly made it so the door wouldn't even close, let alone have a seal that fits correctly.
Below are a few key pictures.

Full album link: https://picasaweb.google.com/107331329764947692089/KennySFJ?authuser=0&feat=directlink

Both doors.

Patch roughed up. Complete with hem. All folded by hand and in a 4" vise! :)
Tacked in..

Bottom of course needed repair as well.
Previous "repair"
New patch panel. Hemmed of course.
Backside
Bottom is non existent! I dont even have a reference!
Yet another picture of the lack of material!

Multiple pcs were made to create the original shapes

Finished inner panel
Forgot the finished surface picture!
Pin It Now!

Friday, August 17, 2012

RE-SKINNED!

Here we go! Well, this door makes this the second piece on this project that will have given me a bit of trouble. The first panel was a fender that had been pushed into something and had curled it under. After I moved it back into place it had already stretched the metal when it was hit. Long story short I worked a bit to get the "waves" out of the fender.

This door was similar regarding "waves"! You'll see below that there was a previous "repair". Of course when they did they repair the panel warped slightly. By the way it was patched they obviously had no idea how to do it correctly. Not a problem..... I give them an E for effort! :)

So needless to say I inherited some issues that weren't going to make my job any easier. To make things worse I had very limited access to the back side of the door skin. This hindered my ability to hammer and dolly the HAZ (heat affected zone)(area around weld that is blue/brown) of my welds. Dollying the HAZ essentially smashes the weld flat and pushes the metal around the HAZ outward. When you weld... the metal around the HAZ contracts and tightens up. When this happens it stretches the surrounding areas (on a microscopic level). This is what causes a panel to warp from heat. Basically it shrinks. The same as if you pull two opposite corners really tight on your bed sheets. There will be a few ripples. Sheet metal does the same thing!

So as you can see there are two very poorly executed patches. Because of the proximity to each other, welding these patches in will inevitably cause a bit of warping if not done correctly. Just like the example I gave about bed sheets..... this is what will happen here. The area where the two patches are closest to each other will tighten up and cause a nice big wave. (Yes it eventually did!)


I must state it here too! NOT MY WORK!  :-)


You cant see it here, but the door skin is pushed in / warped just under the "handle" area, and then just to the right of the top patch is also pushed in.


Here is the new patch I made. Here the entire panel is still "concave" or pushed inward as if someone shut the door with thier butt and pushed it in. Because the door was "oil canning" (the door skin will pop into a position of either inward or outward). This is a sign that the metal is either stretched OR there is stress elsewhere in the panel. I had planned to move forward and use the shrinking the the HAZ was going to create, to help eliminate the oil canning. Meaning it would pull the panel tight and then the stretched metal would be pulled tight and not be able to "oil can" any longer. I have done this before with success, but this time I was not so fortunate!

Here is the lower original patch.

New patch!


Here is the only picture I have of the finished panel. NOT GOOD!
Because I was not able to hammer and dolly the HAZ the panel shrank around the patches so much it pulled a sizable warp between the two corners of the patches that are close to each other. This along with the panel being previously stretched made me stop and reassess the whole execution and method I was going to fix this. As you might notice there is a soap stone outline now!


New patch! Pretty!!!!


Committed now!


There is a heavier piece of metal where the hinge attaches to the door, that I had to drill the spot welds to get loose. Here I have drilled new holes to plug weld the piece back in place while I get the new skin in place.


All tacked in.


Now comes the daunting task of welding the entire thing tack by tack. Tack it, let it cool, and repeat....6 million times!!!!  :-)


Ill post up more when its complete!


Pin It Now!